Saturday, July 11, 2015

Oracle Access Manager Create A WebService for Authentication using Access Gate

Creating a Access Gate using OAM11gR2

The oracle documentation has proper steps for creating a custom Access Gate  but it lacks on steps on how to deploy it . Recently I had to create a Webservice for authentication from OAM using custom access gate and it took a while to deploy it. Below are the brief steps on how to create one. The code was created using eclipse. 

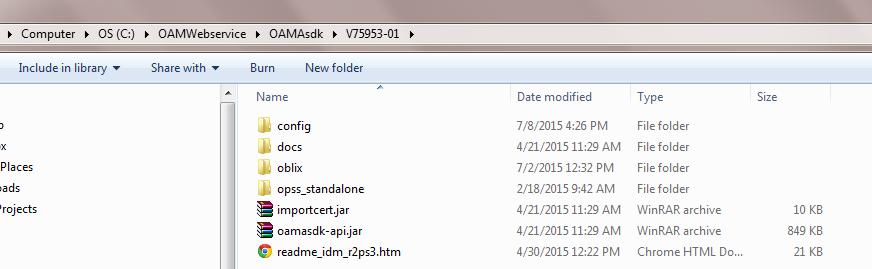
  1. Download ASDK from edelivery.oracle.com. We were using OAM 11gR2 Bp04 but could not find ASDK for the same version. We download the version 11.1.2.2.2 and it worked for us.  
  2. Unzip the contents to a directory.
  3. Create a webservice project in Eclipse
  4. Project Name Used : OamAuthenticationService
  5. In the project class path add the following jar files.
  6. Add the oamasdk-api.jar in the web-inf/lib folder.
  7. Copy the ObAccessClient.xml file to ASDK/oblix/lib folder.(I had a 10 g webgate hence only ObAccessClient.xml) else we need to copy cwallet.sso as well.
  8. For running the code as a standalone java program you need to add jps-config.xml as well under the folder ASDK/config.

  9. Contents of the jps-config.xml should be updated to reflect the Access Gate name.
  10. Write the java code as per the oracle doc. Oracle Doc
  11. I am reading the ASDK location and Access Gate name from properties file. The resource name (ms_resource) should be of the format Access Gate Name from OAM Console /resource.For e.g. in my case the name is http://OAMASDK/fed. Refer screen shot in step 7.
  12. Contents of the properties file:-Note the location is folder where you unzipped the ASDK contents.
  13. Thats all what is required to test the app as a standalone java program.
  14. In order to deploy this to a server with JRF environment there are some further modifications which need to be done. 
  15. Failing to do this may result in run time exceptions like class definitions not found. Create a weblogic.xml file under WEB-INF folder if it does not exist. Add the following contents to the file.<?xml version="1.0" encoding="UTF-8"?>
    <wls:weblogic-web-app xmlns:wls="http://xmlns.oracle.com/weblogic/weblogic-web-app" xmlns:xsi="http://www.w3.org/2001/XMLSchema-instance" xsi:schemaLocation="http://java.sun.com/xml/ns/javaee http://java.sun.com/xml/ns/javaee/web-app_2_5.xsd http://xmlns.oracle.com/weblogic/weblogic-web-app http://xmlns.oracle.com/weblogic/weblogic-web-app/1.3/weblogic-web-app.xsd">
        <wls:weblogic-version>10.3.6</wls:weblogic-version>
        <wls:context-root>OAMAuthenticationService</wls:context-root>
        <wls:container-descriptor>
        <wls:prefer-application-packages>
     <!-- add package names from the Oracle Access Server SDK -->

     <wls:package-name>oracle.security.am.*</wls:package-name>
        </wls:prefer-application-packages>
      </wls:container-descriptor>
    </wls:weblogic-web-app>
  16. On the server where we intend to deploy the WAR file , in  $domain_home/config/fmwconfig folder locate system-jazn.xml file.
  17. Take a back up of the current file and add an entry in the file as follows. Make sure the entry is done under <jazn-policy> section and not under <admin-policy> category.If this entry is not done properly you will get an exception oracle.secuirty. jps.access denied. The file location should be from the tmp folder and the folder name should be the project name. Do not forget a "/-" in the end. <grant>
    <grantee>
    <codesource>
    <url>file:${domain.home}/servers/${weblogic.Name}/tmp/_WL_user/OAMAuthenticationService/-</url>
    </codesource>
    </grantee>
    <permissions>
    <permission>
    <class>oracle.security.jps.service.credstore.CredentialAccessPermission</class>
    <name>context=SYSTEM,mapName=OAMAgent,keyName=*</name>
    <actions>read</actions>
    </permission>
    </permissions>
    </grant> 
  18. Move the ASDK to the server machine and update the path in the java code as required.The jps-config.xml file placed under config folder in step 8 needs to be removed from the ASDK on the server machine.
  19. In the generated war file check that the oamasdk-api.jar is included in the web-inf/lib folder.
  20. Deploy the WAR
  21. Thats all and you should be all good to go.

Wednesday, January 28, 2015

SOA Suite - Adding an existing Database MDS connection to a new Application

When we store artifacts like XSDs in database MDS and want to reuse it in a new SOA application following are the steps which we need to follow.


  1. Once the SOA application is created expand the IDE connections ->SOA-MDS and right click on the MDS connection and select the option Add to Application.
  2. Once "Add to Application" is finished in the left hand side of the Jdeveloper find Application Resources , expand->Descriptors->ADF META-INF->adf-config.xml.
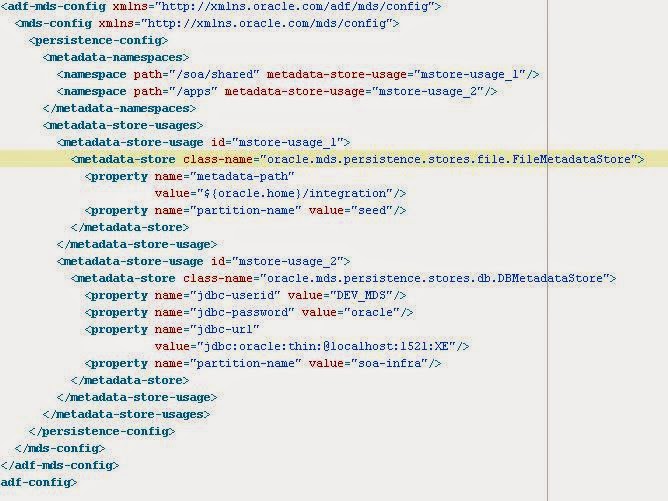
  3. Open the adf-config.xml and look for the mds connection name "mstore-usage_2". Many a time this entry does not exist and you may need to manually edit the xml file like below.
  4. Add the line  <namespace path="/apps" metadata-store-usage="mstore-usage_2"/> under  <metadata-namespaces>.
  5. Navigate to  <metadata-store-usages> and add the entry for "mstore-usage_2" if it does noe exists. If the entry exists make sure the entry for MDS password. <property name="jdbc-password" value="oracle"/>. More than often you need to add it manually.
                 <metadata-store-usage id="mstore-usage_2">
                <metadata-store class-name="oracle.mds.persistence.stores.db.DBMetadataStore">
                  <property name="jdbc-userid" value="DEV_MDS"/>
                  <property name="jdbc-password" value="oracle"/>
                  <property name="jdbc-url"
                            value="jdbc:oracle:thin:@localhost:1521:XE"/>
                  <property name="partition-name" value="soa-infra"/>
                </metadata-store>
              </metadata-store-usage>
  6. Sample XML File.

Sunday, July 27, 2014

Installation of SOA Suite 12c

Oracle recently released the SOA Suite 12c and following are the steps to install SOA Suite 12c on your local system.
1. Download SOA Suite 12c from http://www.oracle.com/technetwork/middleware/soasuite/downloads/index.html 
2. Please note that SOA Suite is certified only for 64 bit machine on a 64 bit JVM. You should have 64bit JDK on your system , Only JRE is not sufficient.
3.The download results  includes two jar files fmw_12.1.3.0.0_soa_quickstart.jar and fmw_12.1.3.0.0_soa_quickstart2.jar

4.Open a command line and execute the command java -jar fmw_12.1.3.0.0_soa_quickstart.jar. Please note that in the class path we should include the path of jdk/bin and java home set to jdk.Or you may execute this command from the jdk/bin folder.
5. This opens up a GUI as follows.Follow the screen shots as listed below and thats it, your SOA is installed.


6. Check that on the file system the following directories are created.
7.This version has an inbuilt jdeveloper which can be used for deploying soa composites as well unlike the older versions of jdeveloper. This means that to test the soa composites on our local system there is no need to create a soa domain. Just start the integrated weblogic from Jdeveloper and it will create a domain and the weblogic server will start. The port for this soa domain is 7101 and username password is weblogic/welcome1. 


Saturday, May 31, 2014

Installation and configuration of Webgate for Oracle HTTP Server

Oracle http  server webgate needs to be installed on both the nodes.Webagtes server on linux require 64 bit libraries for libgcc_s.so.1 under /usr/lib64 folder.
1.       Copy the GCC file libgcc_s.so.1 from /lib64 to /usr/lib64. Make sure the output of all the below commands is greater than 1.
a.        strings -a libgcc_s.so.1 | grep -c "GCC_3.0"
b.        strings  -a libgcc_s.so.1  | grep -v "GCC_3.3.1" | grep -c "GCC_3.3"
c.        strings -a libgcc_s.so.1 | grep -c "GCC_4.2.0"
d.        file  libgcc_s.so.1 | grep "64-bit" | grep -c "x86-64"
e.        file  -L libstdc++.so.6  |  grep "64-bit" | grep -c "x86-64"
2.       Navigate to the installable folder like  /media/FMW/IDM/Webgate/V38082-01/Disk1/install/linux64.
3.       Run the command ./runInstaller.
4.       Click next on the wlecome screen. Wait for th pre-requisities check to be completed.

5.       Specify the installation location /apps/oracle/product/fmw.Leave the Oracle Home Directory as Oracle_OAMWebgate1.Click on Next.

6.       Wait for the installation to be completed.


Configuration of OHS and Webgate

1.  Login to OHS box i.e. and stop the OHS instance(if running) by executing the command ./opmnctl stopall 
2.       Navigate to /apps/oracle/product/fmw/Oracle_OAMWebGate1/webgate/ohs/tools/deployWebGate/ on the OHS box.

3.       Execute the command.  
./deployWebGateInstance.sh -w /apps/oracle/product/admin/instance1/config/OHS/ohs1 -oh /apps/oracle/product/fmw/Oracle_OAMWebGate1
/apps/oracle/product/admin/instance1/config/OHS/ohs1- is the home directory of OHS server instance
/apps/oracle/product/fmw/Oracle_OAMWebGate1 is the home directory of webgate is installation


4.       Set the LD_LIBRARY_PATH variable.
export LD_LIBRARY_PATH=/apps/oracle/product/fmw/Oracle_WT1/lib
Navigate to /apps/oracle/product/fmw/Oracle_OAMWebGate1/webgate/ohs/tools/setup/InstallTools.


5.Execute the command
 ./EditHttpConf -w /apps/oracle/product/admin/instance1/config/OHS/ohs1/ -oh /apps/oracle/product/fmw/Oracle_OAMWebGate1 -o webgate.conf
Excerpt of the command:-
[oracle@linuxmachine InstallTools]$ ./EditHttpConf -w /apps/oracle/product/admin/instance1/config/OHS/ohs1/ -oh /apps/oracle/product/fmw/Oracle_OAMWebGate1 -o webgate.conf
The web server configuration file was successfully updated
/apps/oracle/product/admin/instance1/config/OHS/ohs1/httpd.conf has been backed up as /apps/oracle/product/admin/instance1/config/OHS/ohs1/httpd.conf.ORIG


Saturday, February 15, 2014

Setting up Kerberos authentication on Oracle Access Manager

The configuration for Windows Native Authentication requries a keytab file to be generated by the AD administrator.

                       1.       Send a request to AD administrator to generate a Keytab file .Instructions to be sent to AD                        administrator is as follows.Windows Server 2008 R2.
a.       Create an AD user. username = oam1 password = Welcome1
b.      Verify that the SPNs do not exist for oam1.
a.       setspn -L oam1
c.       Generate the keytab by using the following command.
d.      ktpass -princ HTTP/oam1.domain.com@DOMAIN.COM -pass Welcome1 -mapuser oam1 -out c:\temp\oam1.keytab. (The name oam1.domain.com is the listen address of OAM server. Not specifying any encyption mechanism makes use of RC4-HMAC protocol.)
e.      Check the box does not require Kerberos pre authentication. (this was requried else I was getting an error saying that pre authentication is required.)
2.       Update the krb5.conf file located at /etc folder on the OAM servers 

[logging]
 default = FILE:/var/log/krb5libs.log
 kdc = FILE:/var/log/krb5kdc.log
 admin_server = FILE:/var/log/kadmind.log

[libdefaults]
 default_realm = DOMAIN.COM
 dns_lookup_realm = false
 dns_lookup_kdc = false
 default_tkt_enctypes = arcfour-hmac-md5
 default_tgs_enctypes = arcfour-hmac-md5
 ticket_lifetime = 24h
 forwardable = yes
udp_preference_limit = 1  (I required this paramter because i was getting an error saying that packet size                                                was too huge. Then found that by default kereberos uses UDP Protocol which has                                                     a limitation of paket size. This parameter forces the use TCP protocol.)

[realms]
 DOMAIN.COM = {
  kdc = ADSERVER
  admin_server = ADSERVER
  default_domain = DOMAIN.COM
 }

[domain_realm]
 .lacmta.net  =  DOMAIN.COM
 lacmta.net =  DOMAIN.COM

[appdefaults]
 pam = {
   debug = true
   ticket_lifetime = 36000
   renew_lifetime = 36000
   forwardable = true
   krb4_convert = false
   autologin = true
   forward = true
   encrypt = true
 }

2.       Once the keytab file is sent by the AD administrator validate the keytab file by executing the below command on the OAM boxes.Place the keytab file on the OAM server at /share/oracle/keytab.
kinit -V -k -t /share/oracle/keytab/oam1.keytab HTTP/oam1.domain.com@DOMAIN.COM
                              This should result in an output of “Authenticated to Kerberos v5”.
                       In case you are not able to authenticate please debug and then proceed further.
3.       Login to http://oam.domain.com:7001/oamconsole and open the OAM console.Navigate to System Configuration.
4. Navigate to Common Configuration->Data Sources->User Identity Store and click on New.

5. Create a Datastore such that the samacountname from the AD matches the usernameattribute in the username.In my case the samaccountname in AD was kumarab, but in OID the cn was m80845kumar and orclasamaccountame was kumarab. So when creating the datastorein the username attribute of the datastore i specified orclsamaccountname. (generally we specify cn or uid.)Make the user store the default userstore.
6. Navigate to Access Manager ->  Authentication Modules -> Kerberos Authentication module -> Kerberos
7. Fill in the following details.                                                                                                                                         
   
               Name                                                     
                Kerberos
           Key Tab File
           /share/oracle/keytab/oam1.keytab
             Principal (same as the one which was given when creating the keytab.)
           HTTP/oam1.domain.com@DOMAIN.COM
             KRB Config File
           /etc/krb5.conf

8. Now go to authentication modules->protected policies->use kerberos scheme as the authentication policy.
9. ADD http://oam1.domain.com to your local list of intranet resources in your browser and you should be done.

Some common issues which I faced:-
OAM in most of cases gives a generic error saying userid is locked. Enable trace32 log for OAM and you may be able to see some more details in the diagonistic logs.


  1. gssheader did not find the right tag. The principal name which is sent by the browser does not the principal name in the keytab. for example the principal name sent by browser may be HTTP/oam2.domain.com whereas the keytab may be generated by using HTTP/oam1.domain.com. To find out which principal is generated use the network tracing NETSH Micorosoft netsh command and network monitor tool mechanism of Windows 7 and apply the filter as kerberos to view details. The error in the logs would say " KRB5KDC_ERR_S_PRINCIPAL_UNKNOWN."Hence the spengo token is not sent instead NLTM token is sent. This can be detected by using a HTTP header, NLTM headers are generally one liners whereas SPENGO are bigger in size as compared to NLTM.(Definitely more than one line.)
  2. The other error is GSSException: Failure unspecified at GSS-API level which is  generally due to the non matching KVNO version .This can be resolved   by regenerating the keytab.
  3. Other issue which I faced was to the packet limit constraint, which was resolved by adding a parameter in the krb5.conf. udp_preference_limit = 1.
  4. Other issue is user not found in datastore. In this case cross verify the datastore configured in OAM, make sure the default userstore is the one which has usernameattribute==samaccountname from AD.


Sunday, January 26, 2014

OID-AD External Authentication Password Pass through Configuration

The use case which I will be discussing here is , the user data will be stored will be stored in OID, but for authentication the OID will authenticate against AD. Micorsoft AD will store the password and not OID. This will be useful when the customers want the password to be kept and managed from a single system, whereas other applications may want to use OID as their user identity store like EBS.
The first step would be to configure OID-AD synchronization discussed here .
The steps to configure OID-AD password pass through are as follows:-

  1. Log into OID Server
  2. export  CLASSPATH=$ORACLE_HOME/ldap/jlib/oidexcfg.jar:$ORACLE_HOME/ldap/jlib/ldapjclnt11.jar:$CLASSPATH
  3. java -classpath $CLASSPATH oracle.ldap.extplg.oidexcfg -h oidhost  -p 3060  -D cn=orcladmin  -w XXXXXXXXX -t ad
  4. Transcript of Command in details.

-----------------------------------------------------------------------
External Authentication Plug-in Configuration against Active Directory
-----------------------------------------------------------------------

Active Directory external authentication plug-in: Disabled
Active Directory host name: host.domain.com
Active Directory port number: 389

Using SSL to connect to Active Directory: No

Failover to backup Active Directory: Disabled

External authentication invocation naming context: cn=users, dc=XXXXX,dc=XXXX
External authentication invocation request group:

Do you want to change the configuration? [y/n]: y

[1] Enable/Disable the Active Directory external authentication plug-ins
[2] Modify the Active Directory host name and port number
[3] Modify the Active Directory SSL configuration
[4] Modify the Active Directory failover configuration
[5] Modify the invocation naming context or request group
[6] Show the configuration changes
[7] Save the configuration changes and quit
[8] Quit without saving the changes

2 – Modify AD Host / Port #

Please enter 1, 2, 3, 4, 5, 6, 7, or 8: 2
Please enter host name: ADHost
Please enter port number: 389

[1] Enable/Disable the Active Directory external authentication plug-ins
[2] Modify the Active Directory host name and port number
[3] Modify the Active Directory SSL configuration
[4] Modify the Active Directory failover configuration
[5] Modify the invocation naming context or request group
[6] Show the configuration changes
[7] Save the configuration changes and quit
[8] Quit without saving the changes

Please enter 1, 2, 3, 4, 5, 6, 7, or 8: 4
Do you want to enable failover to backup Active Directory? [y/n]: y
Please enter backup host name: ADBackupHost
Please enter backup port number: 389
Do you want to use SSL to connect to backup Active Directory? [y/n]: n

[1] Enable/Disable the Active Directory external authentication plug-ins
[2] Modify the Active Directory host name and port number
[3] Modify the Active Directory SSL configuration
[4] Modify the Active Directory failover configuration
[5] Modify the invocation naming context or request group
[6] Show the configuration changes
[7] Save the configuration changes and quit
[8] Quit without saving the changes

Please enter 1, 2, 3, 4, 5, 6, 7, or 8: 5
Please enter invocation naming context: cn=OracleUsers,cn=Users,dc=XXXXX,dc=XXXX
Please enter request group:
[Hit Enter] – No request group

[1] Enable/Disable the Active Directory external authentication plug-ins
[2] Modify the Active Directory host name and port number
[3] Modify the Active Directory SSL configuration
[4] Modify the Active Directory failover configuration
[5] Modify the invocation naming context or request group
[6] Show the configuration changes
[7] Save the configuration changes and quit
[8] Quit without saving the changes

Please enter 1, 2, 3, 4, 5, 6, 7, or 8: 1
Please enter 0 to disable or enter 1 to enable [0/1]: 1

.... External authentication plug-ins will be enabled.

[1] Enable/Disable the Active Directory external authentication plug-ins
[2] Modify the Active Directory host name and port number
[3] Modify the Active Directory SSL configuration
[4] Modify the Active Directory failover configuration
[5] Modify the invocation naming context or request group
[6] Show the configuration changes
[7] Save the configuration changes and quit
[8] Quit without saving the changes

Please enter 1, 2, 3, 4, 5, 6, 7, or 8: 7

Exit from external authentication plug-in configuration tool...

Test using ldapbind – enter OID ID and corresponding AD Network Password.

Thursday, December 12, 2013

Integrate Oracle Internet Directory and Active Directory

I recently had to integrate Oracle Internet Directory and Active Directory .We used DIP from OID to integrate with AD.
Following are the high level steps for the same.

1.       Create the AD-OID synchronization profile and set up the synchronization.
2.       Updating of mapping rules for attributes that are being synced from AD to OID.
3.       Boot Strap. This step will bring all the users from AD to OID and the mapping rule should have been applied that we created already.

4.       Enable the synchronization profile for the sync to work from AD to OID.
      The detailed steps are as follows:-
1.        Create a container for example Oracle Users container with following LDIF / and ldapadd command. This command has to be executed from the oid boxes,
ldapadd –h hostname –p 3060 –D cn=orcladmin –w password–f createContainer.ldif

File – createContainer.ldif
dn: cn=OracleUsers, cn=Users, dc=xxxxx,dc=net
objectclass: top
objectclass: orclContainer
cn: OracleUsers
pwdpolicysubentry: cn=default,cn=pwdPolicies,cn=Common,cn=Products,cn=Oracle Context,dc=xxxx,dc=net
  2.       Modify ACI for new container based on ACI for cn=Users container.
                   Refer link :         http://docs.oracle.com/cd/B28196_01/idmanage.1014/b15991/aci_usrs_grps.htm#CHDCDCDD  
a)      Create the ldif file by executing the command ldapsearch –h hostname –p 3060 –D “cn=orcladmin” – w password –b “cn=Users, dc=xxxxx,dc=net” –L –s base “objectclass=*” orclaci orclentrylevelaci >users_acis_orig.ldif.
b)      In the ldif file modify the base from “cn=Users, dc=xxxx, dc=net” to “cn=Oracle, cn=Users, dc=lacmta, dc=net”  and add the changetype to modify and operation add for the 2 attributes orclaci and orclentrylevelaci .
c)       Execute the ldapmodify command. ldapmodify –v –p 3060 –h  hostname –D “cn=orcladmin” –w password
d)      Sample acis file . ZIP File. The zip contains a file called sampleacis.ldif.
3. Create AD Service Account for OID / DIP Connection to AD w/read privilege to the AD Container 
4. Check if AD Service A/c has read privilege on all users + Attributes in container to be sync'd.
5. ldapsearch -h ADhost.XXXXX.net -p 389 -D "oid_svc@XXXXX.net"  -w Oracle2ad -b "OU=Users_General,DC=XXXXX,DC=net" objectclass=*
6. OID AD Service Account details :- 
dn: CN=SVC\, OID,OU=Users_General,DC=XXXXX,DC=net
userPrincipleName: oid_svc@XXXXX.net
Password: Oracle2ad
Creation of Synchronization Profile
1. Login into Oracle FMW console at http://oidhost:7001/em using the user weblogic.
2. Expand the domain and navigate to Identity and Access.
3. Select DIP .
4. From the DIP drop down list select Administration  and then Synchronization profiles.
5. Using the Navigation Path create a new DIP sync profile with a name AD2OID. Fill in the correct AD details.

                            6. Verify that the details are correct by clicking in the Test Connection button.
                     7.       Click OK (upper right corner) to create / save the Profile
                     8..    Select AD2OID  profile and Click Edit.
                     9.     Navigate to Filtering Tab and enter 
                         Source Matching Filter – ‘searchfilter=physicalDeliveryOfficename=*’ as below. (No single quotes.)  Enter the proper search filter. My case I had to pull records  with a                                 physical delivery office name having a value.
                 11     Click ‘Test Filters’ for any errors.
                 12      If no errors found (Check ‘Source Filter Validation Message à Pass: No error).                                   13       Click Ok.

                  Update Mapping Rule
          1.  Create a mapping file for the attributes which will be synced from AD to OID.
         2.   Sample Mapping file:-

 # This file contains the sample map rules. There can be warnings as part of mapping rules validation. 
# Please correct the map rules before putting them into production environment.
DomainRules
# %USERBASE%:%USERBASE%:
ou=Users_general,dc=XXXXX,dc=net: cn=OracleUsers,cn=users,dc=XXXXX,dc=net: cn=%, cn=OracleUsers,cn=users,dc=XXXXX,dc=net
###  
AttributeRules
# attribute rule common to all objects
objectguid: :binary:top:orclobjectguid:string:orclADObject:bin2b64(objectguid)
ObjectSID: :binary:user:orclObjectSID:string:orclADObject:bin2b64(ObjectSID)
distinguishedName: : :top:orclSourceObjectDN: :orclADObject:
# sAMAccountName,userPrincipalName: : :user:orclSAMAccountName: :orclADUser:toupper(truncl(userPrincipalName,'@'))+"$"+sAMAccountname
# attribute rule for mapping Active Directory LOGIN id
userPrincipalName: : :user:orclUserPrincipalName: :orclADUser:userPrincipalName
# Map the userprincipalname to the nickname attr by default
# userPrincipalName: : :user:uid: :inetorgperson:userPrincipalName
# MTA - uid = M+physicalofficedelivery+sn
physicalDeliveryOfficeName,sn: : :user:uid: :inetorgperson:toUpper('M' + physicalDeliveryOfficeName)  + sn
# MTA - cn
physicalDeliveryOfficeName,sn: : :user:cn: :person:toUpper('M'+ physicalDeliveryOfficeName) + sn
# Map the SamAccountName to the nickname attr if required
# If this rule is enabled, userprincipalname rule needs to be disabled 
# sAMAccountName: : :user:uid: :inetorgperson
# Assign the userprincipalname to Kerberaos principalname
## userPrincipalName: : :user:krbPrincipalName: :orcluserv2:trunc(userPrincipalName,'@')+'@'+toupper(truncl(userPrincipalName,'@'))
userPrincipalName: : :user:krbPrincipalName: :orcluserv2
# This rule is mapped as SAMAccountName is a mandatory attr on AD
# and sn is mandatory on OID. sn is not mandatory on Active Directory
SAMAccountName: : :user:orclsamaccountname: : orcladuser:
sn: : :user:sn: : person:
# without which the PORTAL may not function properly 
# The next rule shows any attribute of any objectclass can be mapped
# to different attribute of different objectclass so long as the
# schema and syntax are compatible.
displayName: : :user:displayName: :inetorgperson:
givenName: : :user:givenName: :inetorgperson:
## employeeID: : :user:employeeNumber: :inetOrgPerson:
physicalDeliveryOfficeName: : :user:employeeNumber: :inetOrgPerson:
# physicalDeliveryOfficeName: : :user:physicalDeliveryOfficeName: :organizationalPerson:
title: : :user:title: :organizationalPerson:
# mobile: : :organizationalperson:mobile: :inetorgperson:
telephonenumber: : :organizationalperson:telephonenumber: :inetorgperson:
# facsimileTelephoneNumber: : :organizationalperson:facsimileTelephoneNumber: :inetorgperson:
# l: : :user:l: :organizationalperson:
# mail needs to be assigned valid value for default settings in DAS 
mail: : :user:mail: :inetorgperson:
# GROUP ENTRY MAPPING RULES
# cn: : :group:cn: :groupofuniquenames:
# displayname needs to be assigned a valid value for default settings on DAS
# SAMAccountName: : :group:displayName: :orclgroup:
# Description needs tobe assigned a valid value for default settings on DAS
# Description: : :group:Description: :groupOfUniqueNames:
# member: : :group:uniquemember: :groupofUniqueNames:
# managedby: : :group:owner: :groupOfUniqueNames:
# sAMAccountName: : :group:orclSAMAccountName: :orclADGroup:
                       
                    3.   Copy the zip fileZIP file to oid server to some location say /home/oracle.
                  4.     Execute the below command :- manageSyncProfiles update -h hostname -p 7005 -D weblogic -pf AD2OID -params "odip.profile.mapfile /home/oracle/AD/AD2OID.map"
5. Transcript of session :-                                                                                               
  manageSyncProfiles update -h xXXXXXXX -p 7005 -D weblogic -pf AD2OID -params "odip.profile.mapfile /home/oracle/AD/AD2OID.map"
[Weblogic user password]
Connection parameters initialized.
Connecting at XXXXXXXx:7005, with userid "weblogic"..
Connected successfully.
Map rules "orclodipattributemappingrules" have the following warnings:
Attribute rule "5" has warning: Source attribute ''physicaldeliveryofficename'' is optional for a required destination attribute ''cn''
Attribute rule "5" has warning: Source attribute ''sn'' is optional for a required destination attribute ''cn''
Attribute rule "6" has warning: Expecting 8 fields; found 7
                Assuming default attribute mapping rule.
Attribute rule "7" has warning: Source attribute ''samaccountname'' is optional for a required destination attribute ''orclsamaccountname''
Attribute rule "8" has warning: Source attribute ''sn'' is optional for a required destination attribute ''sn''.
Profile AD2OID successfully updated.  

Validate Profile:  
    
You can validate the AD-OID sync profile by excuting the step below.
1.       manageSyncProfiles validateProfile -h XXXXX-p 7005 -D weblogic -pf AD2OID
2.       Transcript of command from env:-
[oracle@xxxxxxxxAD]$ manageSyncProfiles validateProfile -h xxxxxxxx -p 7005 -D weblogic -pf AD2OID
[Weblogic user password]
Connection parameters initialized.
Connecting at xxxxxxx:7005, with userid "weblogic"..
Connected successfully.

Profile AD2OID has following Error(s) and/or Warning(s):

Map rules "orclodipattributemappingrules" have the following warnings:
Attribute rule "5" has warning: Source attribute ''physicaldeliveryofficename'' is optional for a required destination attribute ''cn''
Attribute rule "5" has warning: Source attribute ''sn'' is optional for a required destination attribute ''cn''
Attribute rule "6" has warning: Expecting 8 fields; found 7
                Assuming default attribute mapping rule.
Attribute rule "7" has warning: Source attribute ''samaccountname'' is optional for a required destination attribute ''orclsamaccountname''
Attribute rule "8" has warning: Source attribute ''sn'' is optional for a required destination attribute ''sn''.
3.       Ignore warnings   

           Boot Strap 

The below steps will load all the users from AD into OID.
1.       Login into the OID box and execute the below command.
2.       syncProfileBootstrap -host mtaoiddev003 -port 7005 -D weblogic -profile AD2OID_EBSID -lp 5
3.       Transcript of the command from the dev env.
[oracle@xxxxxxxAD]$ syncProfileBootstrap -host xxxxxxx-port 7005 -D weblogic -profile AD2OID -lp 5
[Weblogic user password]
Connection parameters initialized.
Connecting at xxxxxx:7005, with userid "weblogic"..
Connected successfully.

The bootstrap operation completed, the operation results are:
entries read in bootstrap operation: 7208
entries filtered in bootstrap operation: 0
entries ignored in bootstrap operation: 0
entries processed in bootstrap operation: 6187
entries failed in bootstrap operaton: 1021